Red Velvet Cake: Date Roaches and Googly-Eyed Ghosts
Make this epic, spooky Red Velvet Cake with Date Roaches & Spooky Ghosts for a dessert that’s guaranteed to be the life of the party!
Servings: 12
Calories: 764kcal
Equipment
- Three 8-inch cake pans, lined with parchment paper
- Stand mixer with paddle attachment or a hand mixer
- Piping bags for frosting and decorations
- Toothpicks optional
Ingredients
Red Velvet Cake:
- 1 cup granulated sugar 200g
- ¾ cup vegetable oil 170ml
- ½ cup unsalted butter melted (113g)
- 2 large eggs
- 1 tablespoon vanilla
- 1 ⅓ cup buttermilk 320g (mix 1 ⅓ cup whole milk with 4 teaspoon vinegar or lemon juice)
- 2 teaspoon white vinegar
- 1 to 1 ½ teaspoon gel red food color
- ¼ cup boiling water 60g
- 2 ½ tablespoon cocoa powder 15g
- 3 cups all-purpose flour 390g
- ¼ cup cornstarch 15g
- 1 teaspoon baking soda
- ½ teaspoon baking powder
- 1 teaspoon salt
Cream Cheese Frosting:
- 1 ¼ cup unsalted butter softened (283g / 2.5 sticks)
- 20 oz cream cheese room temperature (570g / 2.5 blocks)
- 1 teaspoon vanilla
- ½ teaspoon salt
- ½ cup powdered sugar sifted (100g)
Decorations:
- Dates
- Peanut butter
- Chocolate
- Edible googly eyes
Instructions
- Prep the Oven and Wet Ingredients: Pre-heat your oven to 350℉/175℃ and line the bottom of your three 8-inch Ø cake pans with parchment paper.
- In a large bowl, whisk together the granulated sugar, vegetable oil, and melted butter for 1 to 2 minutes. The mixture will look lighter, which is perfect. Add the eggs and vanilla extract, and whisk for another minute until the mixture is very smooth and creamy.1 cup granulated sugar, ¾ cup vegetable oil, ½ cup unsalted butter, 2 large eggs, 1 tbsp vanilla
- Next, pour in the buttermilk, vinegar, and red gel food coloring. Whisk until everything is combined. The batter should be a bright, vivid red.1 ⅓ cup buttermilk, 2 tsp white vinegar, 1 to 1 ½ tsp gel red food color
- Add Cocoa and Dry Ingredients: In a separate small bowl, whisk the cocoa powder with the boiling water. This step helps the cocoa dissolve and brings out its dark richness, giving the cake its deep red velvet hue. Add the cocoa mixture to the wet ingredients and stir until combined. The red velvet cake batter will get even deeper in color now.¼ cup boiling water, 2 ½ tbsp cocoa powder
- Sift the flour, cornstarch, baking soda, baking powder, and salt directly into the bowl. This stops lumps from forming, leading to a perfectly tender cake. Gently and slowly whisk until the dry ingredients are just combined and no lumps remain. Do not overmix! Overmixing develops too much gluten, which can lead to a tough cake.3 cups all-purpose flour, ¼ cup cornstarch, 1 tsp baking soda, ½ tsp baking powder, 1 tsp salt
- Bake the Cake: Divide the cake batter evenly among your three 8-inch cake pans, or pour all of it into one 8-inch/9-inch pan if you prefer a single layer.
- Bake for about 20-25 minutes if using three pans and around 50 minutes if baking the cake batter into one. To check if it's done, insert a toothpick into the middle of the cake. It should come out with light, moist crumbs clinging to it (not wet batter).
- Remove the cakes from the oven. Let them cool in the pans for 15 minutes. Carefully turn the cakes out onto a wire rack and let them cool down completely. This is important before frosting!
- Making the Cream Cheese Frosting: Add the room temperature butter, cream cheese, vanilla, and salt to the bowl of a stand mixer. Use the paddle attachment to whisk on medium speed for 2 to 3 minutes until the mixture looks smooth. Stop and scrape the bottom and edges of the bowl once.1 ¼ cup unsalted butter, 20 oz cream cheese, 1 tsp vanilla, ½ tsp salt
- Add the sifted powdered sugar slowly, while whisking on medium speed. Stop whisking once the sugar is dissolved and a fluffy frosting is formed. If the frosting is too soft or runny, just refrigerate it for a few minutes until it gets to a good spreadable texture.½ cup powdered sugar
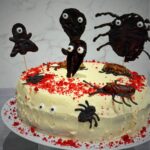
- Date Roaches: Date Roaches: Slice each date lengthwise and remove the pit. Cut each date in half and fill the center with a little peanut butter. Dip or cover just the peanut butter part with melted chocolate to seal it off, then place each piece face down on parchment paper, with the peanut butter side touching the paper. Use the chocolate to shape the legs and antennae. Chill in the fridge or freezer until set, making sure the legs are thick enough so they don’t break when you lift them off the paper. Chill in the fridge or freezer until set.Dates, Peanut butter, Chocolate
- Chocolate Spiders: Melt a small amount of chocolate and place it into a piping bag or a corner of a Ziploc bag with a tiny snip taken off the tip. On a piece of parchment paper, pipe small circles for the chocolate spiders. While the chocolate is still wet, draw 8 thin legs coming out from the body.
- Spooky Ghosts: Pipe a small mound of melted chocolate, then drag the tip downward to form a wispy tail shape. While the chocolate is still wet, add one or two edible googly eyes. Let them cool completely until solid. You can insert toothpicks to attach the ghosts to the cake. Make sure the chocolate layer is thick enough so they don’t break when you lift them off the paper.
- Assembling the Red Velvet Cake: Once the cake (or cakes) have completely cooled, trim off any domed tops. If you baked one large cake, carefully slice it horizontally into three even layers using a large serrated knife. If you baked three separate cakes, simply level the tops if needed. Spread a generous layer of cream cheese frosting between each cake layer, stacking them as you go. Save any trimmed pieces for decoration later.
- Cover the cake with a thin layer of frosting (this is the crumb coat). This seals in all the loose crumbs. Refrigerate the cake for 15 minutes to let the crumb coat set. Use the remaining frosting to finish covering the cake, spreading it as smoothly as you can.
- Finally, decorate! Gently press the reserved red velvet cake crumbs onto the sides or the top edge of the cake. Place your date roaches, chocolate spiders, and googly-eyed ghosts all over the top. Serve it up and watch the reactions!
Video
Notes
- Weigh Your Ingredients (Crucial!): For the absolute best and most consistent results, always use a kitchen scale and the metric weight measurements for ingredients like flour (390g), sugar (200g), and buttermilk. Measuring by weight is more accurate than cups and ensures the light, velvety texture.
- The Secret to Velvet Texture: This recipe guarantees the best crumb because you whip the egg whites separately into fluffy peaks before gently folding them into the batter last. This one step incorporates essential air—do not skip it and do not overmix the final batter!
- Frosting and Chill Time: Your cream cheese frosting must use full-fat, brick-style cream cheese. If it's too soft, chill it for 10-20 minutes. Always refrigerate the fully frosted cake for 30–60 minutes before slicing; this simple step keeps the layers stable and the slices neat.
Nutrition
Calories: 764kcal | Carbohydrates: 53g | Protein: 8g | Fat: 59g | Saturated Fat: 29g | Polyunsaturated Fat: 10g | Monounsaturated Fat: 15g | Trans Fat: 1g | Cholesterol: 149mg | Sodium: 592mg | Potassium: 168mg | Fiber: 1g | Sugar: 25g | Vitamin A: 1545IU | Calcium: 105mg | Iron: 2mg
